Forum Replies Created
-
AuthorReplies
-
11th October 2026 at 22:34 in reply to: Jammed Engine and Stuck Lucas Distributor in V12 Engine #26728Laurence JonesKeymaster
Hi All,
Just to let you know I haven’t had a chance yet to work on the car to tackle removing the starter motor, mainly because I can’t get the car into the garage with driving it in 😂
The drive is on a slope, and it isn’t going to be easy to get the car up the slope and into the garage over the inspection pit, and I’m not attempting to do this lying on my back on a gravel drive while the car is up on ramps (though I doubt I could get it onto ramps either).
So, when I solve the problem of moving the car, I’ll let you know how I get on with the starter motor
(quietly hoping it will solve itself and start working again without me having to remove it, if I leave it long enough 🫣)
Laurence
Laurence JonesKeymasterHi Adam,
Have you managed to source a set yet ?
Laurence
Laurence JonesKeymasterHi Tony,
Have you managed to sort your issue out ?
Laurence
Laurence JonesKeymasterHi Keith, and welcome to our Club.
I’ve one fitted on my 4l Facelift Convertible, because it was constantly draining the battery (small draw all the time for clock and computer I’m guessing), and had no problems at all with it. Remote control was fine.
I fitted one to my V12 Convertible for the same reason, but had issues when the battery itself got a bit tired. Having the unit sat between a tired battery and a chugging great V12 on engine cranking proved too much at times. The battery was marginal and the kit was enough to prevent engine firing, healthy battery and all good.
It’s a pain that the clock looses its time all the time. I did contemplate putting a rechargeable battery under the dash that kept the clock going and was charged when the engine was on (battery switch on) but haven’t solved that yet
Cheers,
Laurence
Laurence JonesKeymasterThank you to those who have placed an order for our new Club Window Stickers.
There has been a short delay posting these out, as I rejected the first batch produced for me, and had to find another company who could do as needed. New batch has arrived, and all those orders have now been enveloped and posted.
Members can no go ahead and place their orders, and there should not be a delay in sending them out to you 🙂
Laurence
19th September 2026 at 20:52 in reply to: Jammed Engine and Stuck Lucas Distributor in V12 Engine #26644Laurence JonesKeymasterHi all,
I thought I’d give an update to this issue.
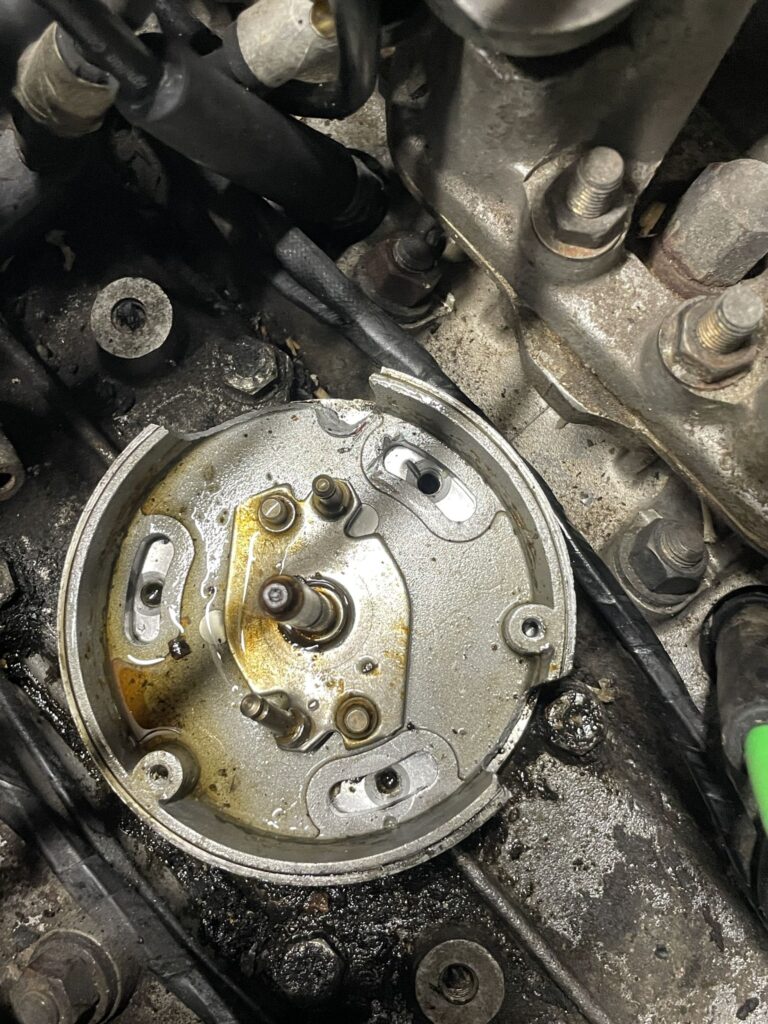
I was able to free the distributor by breaking the rules, by turning the V12 engine backwards a 1/5 turn via the engine crank nut. Soon as the engine move anticlockwise, the distributor just popped out no problem.
I then obtained another distributor and fitted everything back together. Slight challenge was now encountered due to the position (rotation) of the distributor being incorrect…. because I’d rotated the engine after initially marking the rotor arm position.
Before I could work on the timing, the engine jammed again – sure not the distributor yet again….
Nope, the distributor lifted out easily but the engine remained jammed – the starter motor just clicking and not motion.
It would appear that my issue now, and possibly all along, is the starter motor. I’m not looking forward to removing that huge and almost totally inaccessible object, but needs must as I’ve tried every other way to get the engine to start but the starter just sits there clicking at me.
I’ll update when I have more information after tackling the Starter Motor.
Laurence
Laurence JonesKeymasterHi Tony,
There are a number of reasons this happens, and it is a case you need to work through them to establish which is your issue.
Your message implies both windows, and often this is caused if you don’t fully lower the hood (roof) itself completely the micro switches do not get reset for the rear quarter windows. The solution to this, often, is to lower the roof fully, and hold it in the closed position with your finger still on the switch for a few seconds. Release your finger on the switch and raise the roof again FULLY. You may have to repeat this a couple of times.
One thing to try, is to get someone to physically pull the window glass as the hood is raised, and I mean PULL, with a gentle wobble front to back. If the window suddenly engages and starts rising, then your next point of investigation is the semi circle toothed rail that the motor engages into – sometimes the window goes beyond the end of this in it’s downward travel and needs pulling back onto to recover. I have this on my Convertible, and to prevent the issue re-occuring, I lower the roof almost down, stop, and then lower it the rest of the way, which takes out the downward momentum and helps stop everything jumping off the teeth.
If that doesn’t work then you need to check whether the windows themselves go up and down, by applying power directly to the terminals on the relays – these are located under the “rear seat: locker box, behind a little plastic cover. I’m not sure where they are if you have rear seats actually fitted to your convertible. By apply 12v directly across the contacts on the respective relay you should be able to make the window go up, and go down – this approach effectively circumvents whether there is power coming from the ski slope switches or not.
Hope this helps,
Laurence
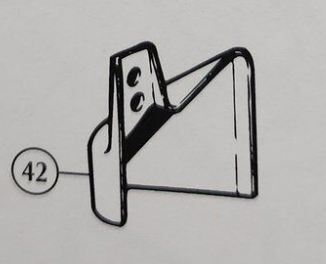
Laurence JonesKeymasterIn case anyone is interested, the part numbers are :
BAC6087ND – JAGUAR HARDTOP CATCH COVER (right hand)
BAC6086ND – JAGUAR HARDTOP CATCH COVER (left hand)Laurence JonesKeymasterLooking at the Jaguar part’s diagram for the hard top it looks like the covers, that Brian has shared a photo above, fit with their two holes upwards. The image below is for the right hand side (when looking from the front seats towards the hard top.
 🔍Laurence JonesKeymaster
I found this on the internet – rather long but might be useful to someone :
—
Last modified 2005 APR 07 04:37:58 GMT
To: xj-s@jag-lovers.org
From: Sean.Straw+Jaguar@mail.professional.org (Sean Straw)
Subject: Stereo Install: 88 XJSC[revised 18 JUN 1998] Jason Philbrook of the XJS Jaguar Lovers list has posted similar instructions including photographs of the install at various stages. You can find these at http://f64.nu/xjsradio/.
So, I posted here last week about the factory cassette and the security code (which was restored to operation when the water evaporated, BTW). Couldn’t find any reference to how to de-code it, so I bit the bullet and purchased a new stereo (though I still need to address the slight water leakage from above, which seems to have been from rain).
[revised 18 JUN 1998] Well, actually, after the NEW stereo shorted out unexpectedly a few weeks ago (causing a corresponding constant drain on the battery), I found that the A/C was occasionally dripping on the stereo – it had nothing to do with an external water leak. Mixed blessings I guess. After receiving a new replacement Sony ES XRC 8200, I reinstalled it today accompanied by a 5 mil sheet of mylar installed over the top of the stereo cage and extending past the back of the stereo, with bent tangs down either side (just to the rear of the cage). After installation, I confirmed that the mylar was still sitting on the stereo properly by sighting it from either side with the console vent panels removed.
I’ve got some notes for the install, should anyone be interested:
There is a 10A blade fuse in the passenger-side fuse panel for the Radio/Cig Lighter.
There is an inline 2A (TDC 91) fuse under the centre console for the radio (although the factory service manuals call it a 1A (this may be a function of the difference between US and UK ratings standards) and place it “behind the stereo”). I found this after the new stereo popped it (requiring me to disassemble the console while following the power lead). On my LHD version, the fuse is on the driver side of the shifter assembly, and was wiretied to a bundle and taped to another (ie, you have to untape it to get a fuse in and out, AND it is tight working because there isn’t a lot of play with the wire).
Both the stock stereo and (my) new replacement are fitted with 10A blade fuses as well.
Anyway, removal of the stereo is fairly straightforward:
Park on a level surface and be sure to engage the parking break. Move the gear selector down to 1st gear (to give you clearance to the stereo).
Remove the two environmental knobs by firmly pulling them. Note that they don’t interchange (they’re notched 180′ out from each other) – but figuring out which one is which is easy – the FAN should be off when you do this (well, I normally don’t turn the car off with things ON), and that one will have the indicator facing down when you reassemble.
Behind the knobs are keyed nuts. Remove by using an appropriatley-sized flatbladed screwdriver while pushing in on the face plate (reducing the back pressure on the nut).
Once you have the two nuts out (one on each control shaft), you should remove the stereo face trim (this didn’t seem to be on too tight – it came off easily enough). Use an allen wrench or some other small bent piece of metal and gently insert it between the stereo and the facing along the side of the stereo (there is some space there), and pull the facing forward a bit at a time (possibly alternating sides). You can also do the same along the bottom of the facing (near the console) and along the top (below the light switches and trip computer).
Note that there are wires along the bottom edge, and they don’t have a long play, so you’ll be pulling the TOP DOWN rather than the bottom up when you clear the front of the stereo housing. Be careful: there are fibre optics here for lighting.
To either side of the stereo are two screws. Remove them and slowly pull the stereo outward. Disconnect the stereo from the two harnesses (speakers and power/controls), unscrew the grounding strap and unplug the antenna. Remove stereo. Note: I reconnected the stereo, and at least within a 5-10 minute timeframe, it is still operational with security code intact).
Because I’m not currently rewiring the speakers, I opted to retain the existing wiring harnesses – which I clipped from the old stereo, and installed bullet plugs on (leaving enough wire on the old stereo to be able to easily install bullet plugs on it should I ever re-install). The original speaker harness is 9-position in 3×3 arrangement, though only 8 conductors are used (2 for each of the four speakers).
The speaker wires are labeled with yellow strips further in the dash. Striped is (-), so install bullet recepticles (female) on those wires from the plug, and bullets (male) on the solid coloured wires. These correspond to the standard bullet plug wiring that most new stereo harnesses should have (the last four I’ve installed have been this way at least).
STEREO CAR (stereo-side of harness)
Front Right (grey) red
Front Left (white) orange
Rear Right (purple) brown
Rear Left (green) green
When crimping on the stereo-side harnesses (from the OLD stereo), I’m assuming you’ve popped them out of the car with the old stereo, THEN clipped them from the stereo to work on them – don’t do it on a live system.On the power harness (6 conductors in a 2×3 arrangement), we have a red, yellow, white, black, and white+red wire. The black conductor (stereo side) is N/C on the car side – just wrap it around the others (after you’ve crimped the bullets on the others). The Red is +12v constant (often the actual source of current for modern stereos – it is used for memory and clock – but also for auto head-disengagement on ignition off. This is the line that runs to the fuse box and has an inline fuse under the console), the Yellow is +12v accessory (the signal that says “turn on” – may also be primary power to the unit – or generally used to be), the white is antenna (+12v out FROM the stereo when you use the Radio), and the white+red is +12v lighting (your stereo may or may not have an input signal for this – it allows the stereo to dim when the lights are turned on).
Crimp a male bullet to the antenna connector on the harness, and female bullets to all the others (I’m specifying gender only because if a wire were to manage loose, you don’t want the +12v source lines to have exposed metal contacts to make ground with – thus you make them the females/recepticles which are better shielded (I don’t have any of those clear soft-rubber insulator boots like you’ll find on most new wiring harnesses, which would eliminate this problem).
Crimp a female bullet to the antenna connector on the STEREO harness (the one included with the new stereo), and male bullets on all the power/light leads.
Okay, Wiring 101 is basically complete. Now for the stereo framing (the REAL work). All new stereos I’ve ever purchased have included a mounting frame, which the stereo itself slides into. We’re going to modify this. I’m going from memory on this part, but what you need is some medium gauge sheet metal (the same gauge you might do flashing with for house gutters) and to cut two pieces about 1.5″ wide, and as long as the stereo cage is high (going from memory, it is around 2″ to 2 1/8″). Eyeball the old stereo and mark the two pieces of metal and bend them at about the same point (placing them in a vise and tapping them over with a hammer works well). Line them up on either side of the stereo cage and compare the clearances with the old stereo (you want something with the same reach for the screw holes — but not too much more, because it will interfere with the environmental controls). Mark the points for drilling some slots into them (to match the screw holes in the original). You want oversize holes because you need some room to adjust the position with (this whole cut/bend/drill thing being something less than precision engineering). Drill the holes in the metal (I have a metal drillpress and a drilling vise, which makes drilling the pre-bent metal much easier – with a bit of wood under the sheet metal for support and drill buffering). Hold these up to the sides of the cage and compare against the original. Re-drill as necessary.
Despite the fact that the original stereo had a groove cut out from between the two screw holes on either side, I found that straight sheetmetal on either side worked fine and didn’t interfere with the environmental controls (as long as the sheetmetal didn’t extend too far past the limits of the screw holes).
BTW, I would suggest that you mark one of the tabs as L (left) and the other as R (right), and stick to using them in that order, since you’ll no doubt have subtle variations in the alignment of the two against the sides of the cage (especially so for this next part — I’ve yet to see a stereo cage that is symetrical in the way the pre-cut tabs are organized on the sides).
Okay, now for the precision part. Reattach the facing trim piece to the old stereo and take the new stereo and insert it into the cage. Lay the two stereos next to each other on their sides (next to the edge of a worktop, so the tangs on the old stereo don’t make it sit weird), and position the new stereo such that the back of the trim plate on it is about even with the back of the trim plate on the old stereo. Set the made tang (with the flush part facing the BACK of the new stereo) on the new stereo and mark its position. Repeat for the opposite side with the plate for that side (or measure your mark on the first side, and remark the opposite to match). Eyeball a good spot on either side for two 1/8″ drill holes in the cage (as they generally are not solid metal on either side). Mark and set punch, then drill the cage (I moved the drill plate to one side, then placed a piece of scrap wood in the cage, and drilled it that way). Then place the metal tabs on either side and mark them through the holes. Set punch them, and drill. line them up to the cage and pass through a pair of 1/8″ rivets (FROM THE INSIDE OF THE CAGE). These may be a tight squeeze, so when drilling, it might help to excercise the hole a LITTLE bit when drilling (both the tabs and the cage). Pop the rivets and trim the excess on the outside (these shouldn’t interfere with much though).
Test fit the stereo into the cage. The rivets shouldn’t interfere much with the movement of the stereo in and out.
Install the cage into the car. If you made the holes slightly oversized as suggested, you’ll probably need washers for the original screws. Tighten enough that you can nudge the cage but that it holds position. Eyeball center, then test fit the facing panel in front, and adjust until it looks better centred. Repeat, then tighten the screws all the way.
Pull the wiring harnesses, grounding strap, and antenna lead through the cage.
Hook up bullet plugs as appropriate to the wiring schematic for the stereo (note: in my case, the yellow and red wires hooked up to the opposite colour on the car’s harness, so don’t assume that the colour codes are going to match). Connect the grounding strap to the rear of the stereo, and ground line from the stero harness as well. You may find that you need a small washer to do this — in my case, the head on the screw that was threaded for the new stereo was much smaller than the hole in the grounding strap.
Plug in the speaker harness (this may be something you choose to do after you have the stereo running, as you can manually isolate which speaker pair is which – at least, this is how I confirmed which wires were which before inserting the stereo into the car dash).
Do a sanity check of the wiring, and turn the key to accessory (1), and see if your stereo lights up. It should. Listen to it, realize that the world of DIY is good, then turn the ignition off, and insert the stereo into the dash plate.
Here’s where things get a bit tricky: when I installed mine, AFTER I’d completely reassembled everything, I could hear a vacuum leak behind the stereo. It seems the wiring harness (possibly when I’d pulled the old stereo), had pulled a hose from a vacuum line (I believe these are the hoses for the vents). Before you screw everything back in (but with the stereo pushed in), move the gear selector back to neutral and fire up the ignition and listen for any vacuum hiss. Turn the ignition off. If you heard a hiss, pull the stereo and reconnect the vacuum line (it is at a Y almost dead centre of the back of the stereo compartment). I rerouted it behind the wires entirely (it seems mine pulled free because one of the hoses had been routed in front of one of the harness wires). Reinsert the stereo and recheck.
Snap in the front trim (if your stereo has one), and test the clearance of the removable faceplate. You DID get a removable faceplate stereo, didn’t you? If not, then you might find that you have to install the dash facing and inserting the stereo THROUGH that – but otherwise, the instructions should be about the same.
Now, you may find that you need to adjust the centering of the stereo a bit (if you didn’t get it right on above). Pop the dash facing and loosen the screws enough to adjust the cage and nudge it as needed.
With the dash facing back in (you did check that all the wires and the fibre optics were properly seated on the controls, didn’t you?), and the stereo fitted proper, you shoud be able to insert the nuts on each of the control knobs and tighten (to get them to line up proper, you may find it handy to take another fine-pointed tool and equalize the pressure on either side of the nut as you begin the threading). Tighten (press in on the facing to take up the slack), then replace the control knobs (the fan one should be facing down when off).
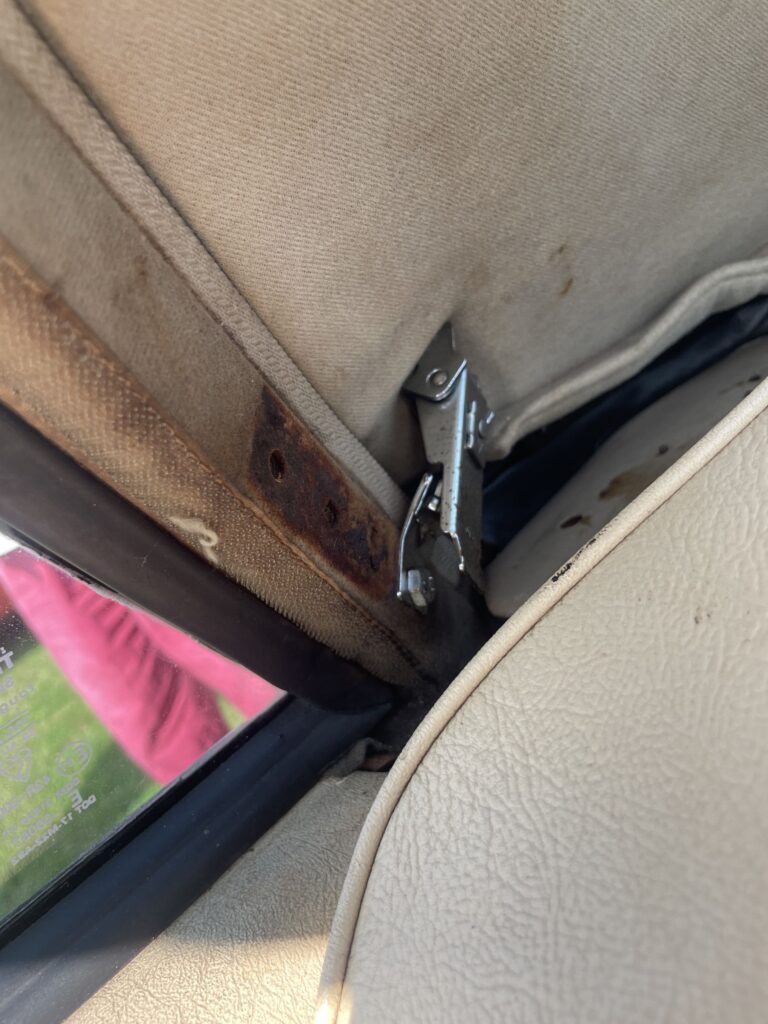
Laurence JonesKeymasterIt doesn’t seem to look too good once you’ve removed the soft top bracket after years and years of being there – someone mentioned that they’d heard there was a plastic piece that fitted here, but we couldn’t determine whether it was to hide these “spare” holes or to sit over the hard top bracket in some way. Does anyone have photos of what this might possibly be, or bright ideas on how to tidy up the historic fixing marks ?
Laurence
 🔍Laurence JonesKeymaster
Hi Keith,
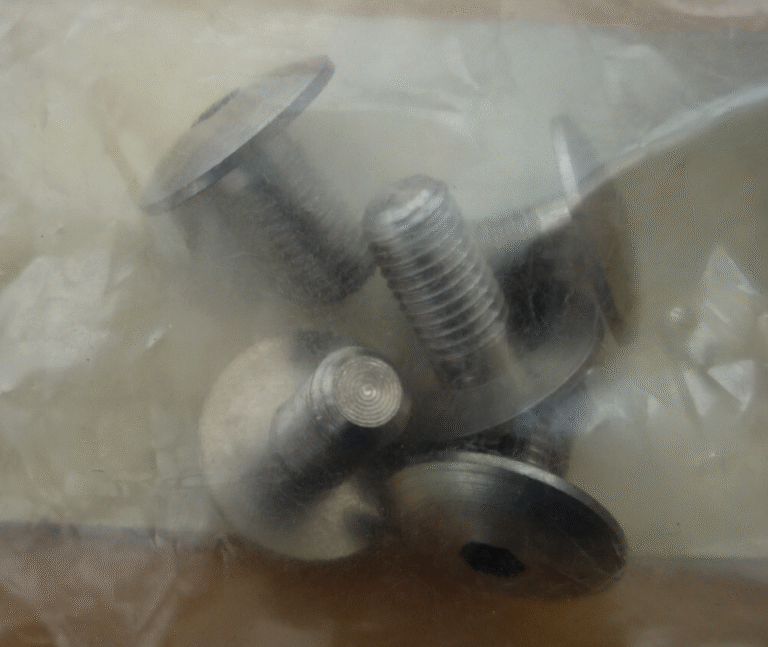
You can buy the replacement bolts for refitting your soft top, on eBay
Question 4 : I think you will find that they were all fitted with rear window heating wiring, as they all started life as Coupes. If you remove the “parcel shelf” padded panel across the back of the seat back area you will likely find the wire there.
Laurence
 🔍Laurence JonesKeymaster
Hi Lloyd,
That is very useful piece of information. Did you have to take multiple photos, from different angles/rotations ?
Was it expensive ?
Cheers,
Laurence
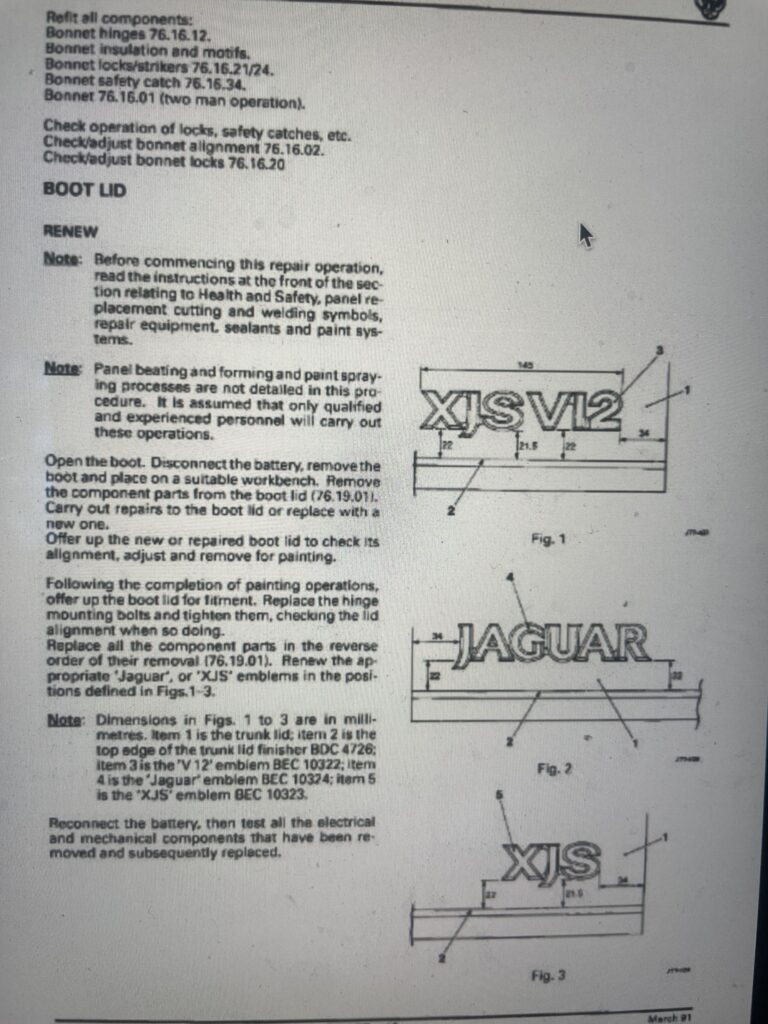
15th August 2026 at 14:33 in reply to: Where to place the XJS and Jaguar badges on rear boot edge #26309Laurence JonesKeymasterI received some helpful information about the placement of these badges.
 🔍
🔍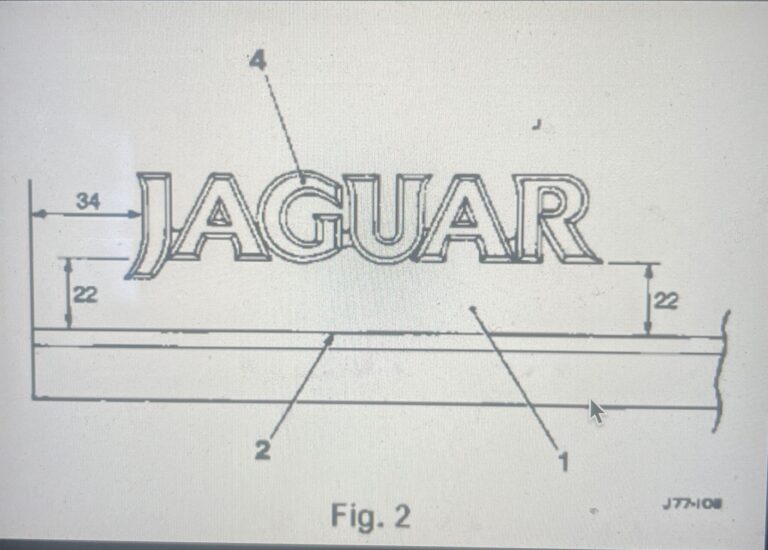 🔍
🔍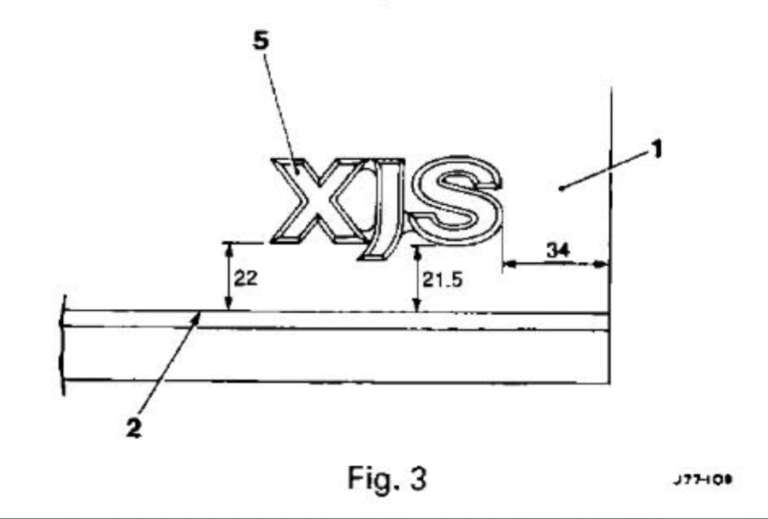 🔍
🔍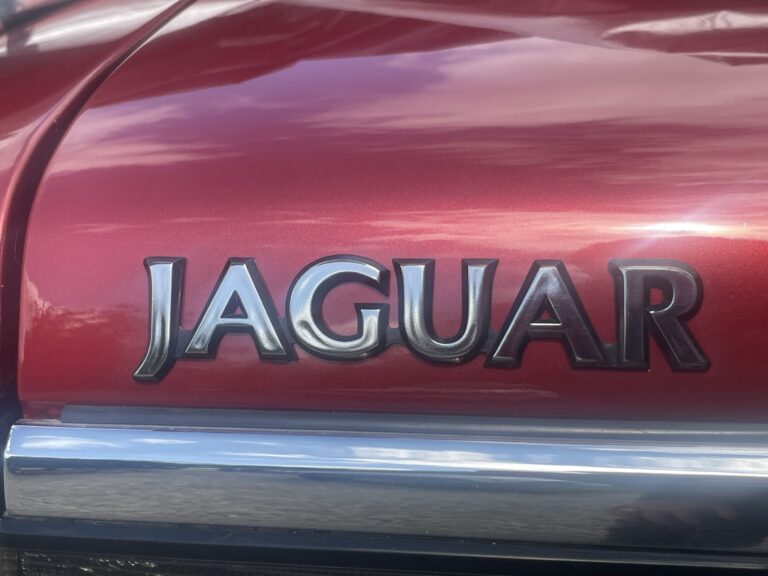 🔍
🔍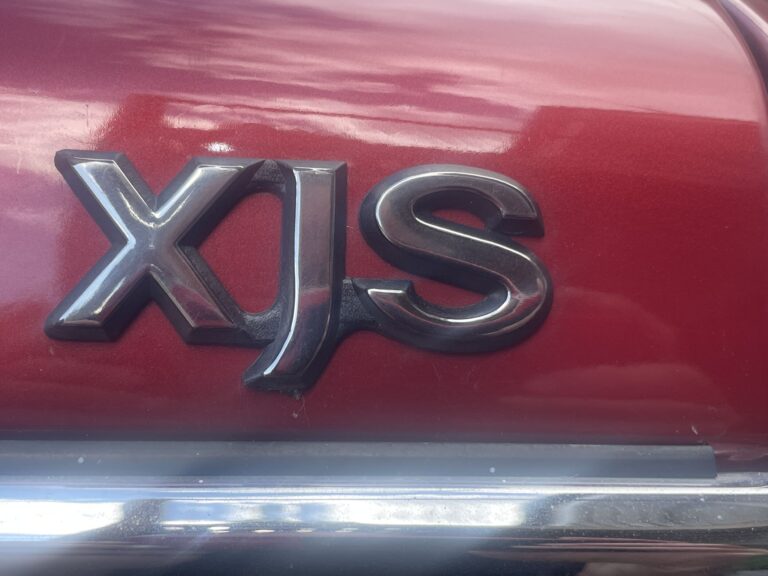 🔍Laurence JonesKeymaster
All sold now.
Laurence
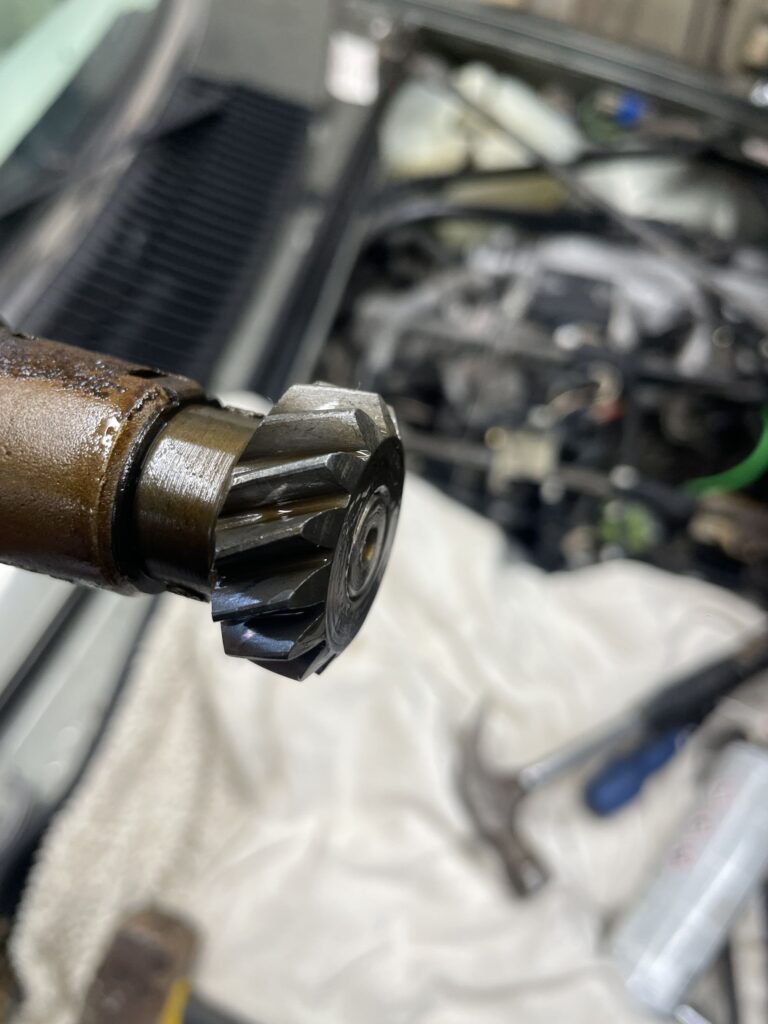
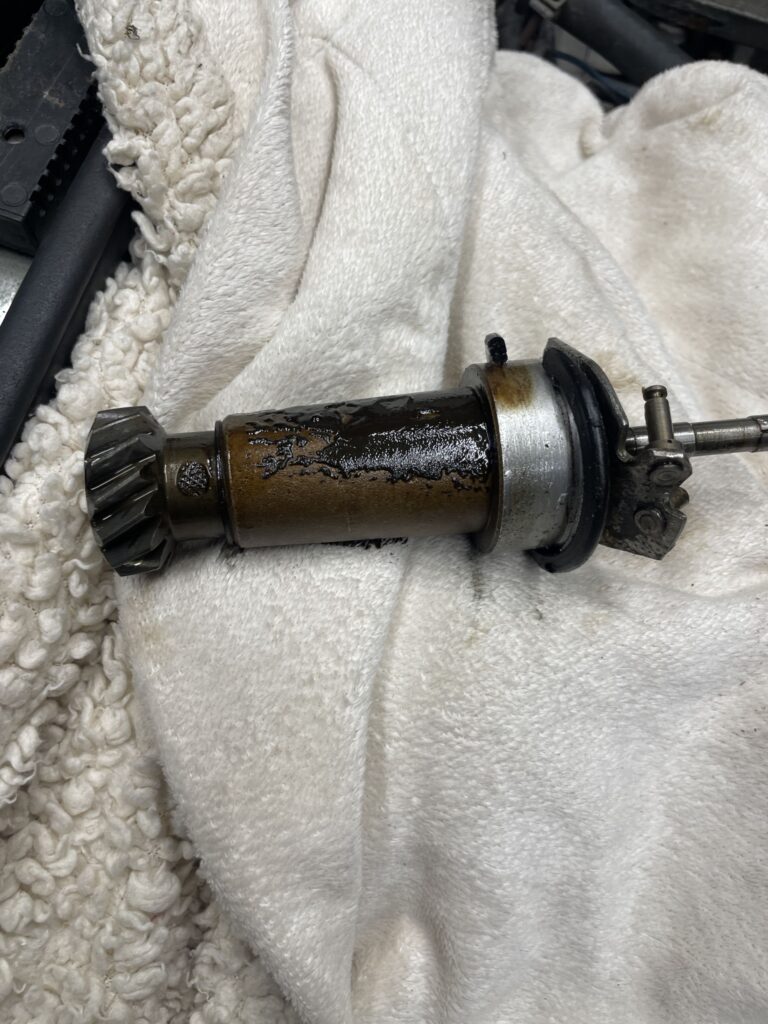
4th August 2026 at 12:33 in reply to: Jammed Engine and Stuck Lucas Distributor in V12 Engine #26150Laurence JonesKeymasterAfter a lot of effort to get the jammed distributor out, I succeeded – only after carefully rotating the engine backwards on the crankshaft bolt, which freed the Jam and the remains of the body and shaft came out (I say remains as I basically destroyed the case and everything else trying to get it out when it was stuck in place…).
Search now begins for a decent replacement Distributor that won’t break my budget 🙂
Laurence
 🔍
🔍 🔍
🔍 🔍Laurence JonesKeymaster
Hi Keith,
The XJ-SC Cabriolet was built on the basis of a nearly completed XJ-S Coupe, with the modification concentrating on cutting off the roof and also adding some strengthening metal work. The fuel tank as far as I’m aware, retained the original Coupe’s – hence why you can retro fit rear seats from a Coupe into a Cabriolet, complete with the rear seat belt mounting points being there ready for you to use etc.
Laurence
Laurence JonesKeymasterThanks Ian.
The twin coils is not something I have replaced, so happy to explore that avenue.
I’ll buy the DAC 6093 Ducelier coil (should be here in a few days) and strip out the two existing coils.
I did think it was me, and the gap I’d set for the pickup when I replaced it, but seeing as I’ve adjusted this numerous times now statistics say I should have landed on an acceptable gap by now..
Laurence
25th July 2026 at 11:31 in reply to: Cleaning made my blue top black (apologies to Crystal Gayle) #26067Laurence JonesKeymasterI’m sure they can be recovered, but might take some practice to get the canvas to stretch and stick neatly on the curves. Should be possible though.
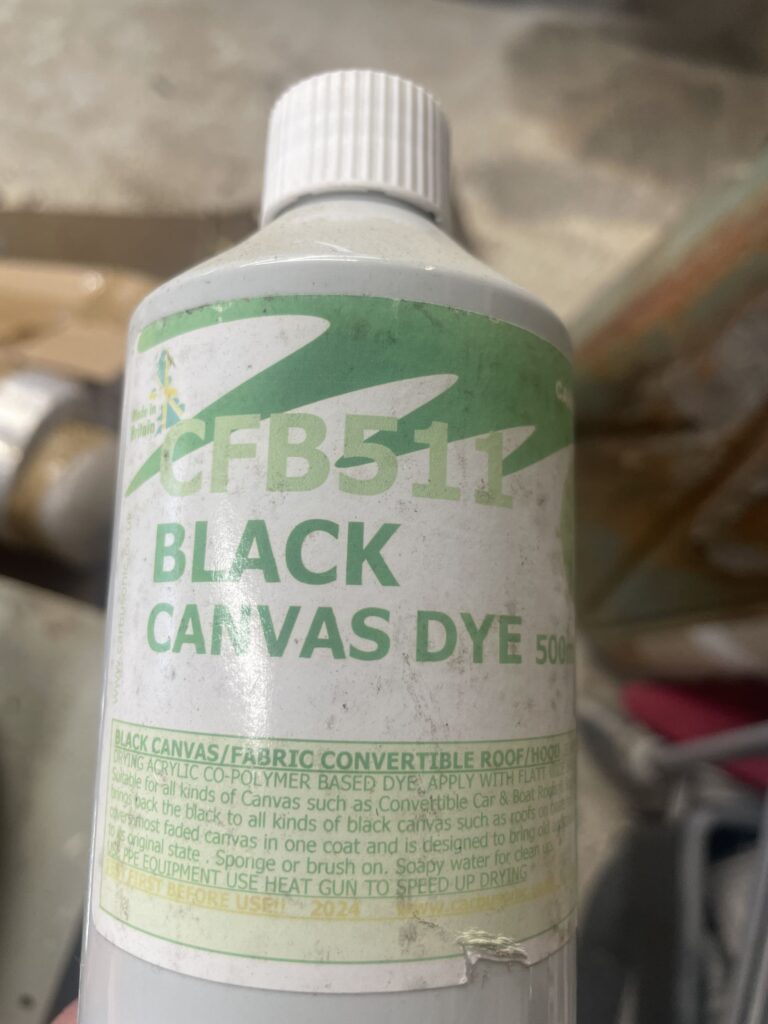
I’ve had great success recolouring both Cabriolet and Convertible roofs, using this Canvas Dye. I’d imagine it would work well recolouring blue back to Black.
Laurence
 🔍Laurence JonesKeymaster
Just 4 sets left. I won’t be getting any more made.
Purchase via this link
https://square.link/u/5dYSlUHF
Cheers,
Laurence
-
AuthorReplies